Tuesday, September 27, 2011

Low Input Washing & Dyeing of Wool - Part II


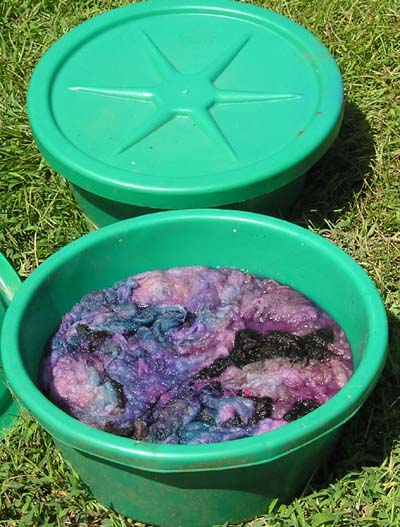
The second phase of the low input washing and dyeing experiment began with filling two old feed supplement tubs with water from the cistern system, putting in a generous two cups of vinegar and letting it warm up in the sun of a 90 plus degree day. I added the fleece (single fleece split in half), springled the dye on top (Cushings myrtle green and Cushings violet) and let it sit a minute. Then I mixed dye and wool by massaging them together with my hands (wearing gloves and mask because of the dye in powdered form). The point of this was to make the dyes color split to produce more interesting effects. The picture shows the fleeces in the dye pots after having been mixed together. I put the lids on and left it for 3 days. When I opened them up the dye bath was exhausted (no color left in the water). One rinse with warm water from the cistern and spinning out in the washer tub, resulted in minimal to no excess dye coming off (a very good sign). Now it is just time to let it dry and see how it spins up in the next phase.

Saturday, September 24, 2011

Low Input Washing & Dyeing Wool - Part I


This is my first try at seeing just how little in external energy inputs I can use to wash and dye wool. The idea was sequential washing and dyeing of the wool as opposed to just washing the wool and then expecting to spin it myself or send it off to be made into roving or yarn. The fleece was another soft Jacob fleece that I "discovered" while organizing/cleaning the basement. It was soaked in rain water from the cistern system (shown in picture) for 3 days (during 90 degree weather). The water was then drained off and used to water plants. This was
followed by a second soak for three days, after which the water was drained off, and the wool spun out in the washer tub to remove as much excess water as possible. At this stage the wool didn't feel too greasy at this point and the water wasn't that dirty either. I have used no soap and the wool seems like it is now ready for dyeing.

Friday, September 16, 2011

Crocheted Roving Rug


This was my first foray into crocheting with roving and I used a plastic size S hook. This black shetland roving was made from fleeces that were a bit tender and hence had more noils and neps than I would want in a roving for spinning. The first rug was bath mat sized, originally measuring 21" x 35". After wetting (done in the shower) and washing with Charlie's Soap, I rinsed it in rain water and tumbled it in the dryer with no heat to get out the excess moisture, then allowed it to air dry. The finished rug is 19.5" x 31" and it is tighter and feels firmer than it did originally, although still quite soft.

Friday, June 17, 2011

All It Took was the Lure of a Yarn Shop


I moved to Efland about 3 years ago and checking out (as in walking around) original downtown Mebane was on my do to list, but it just never happened. However while at Carolina Fiber Fest in May, someone told me that a yarn shop was opening up in Mebane. Ah the lure of yarn - soft, cushy bulky yarn, in particular and I was finally motivated enough to take the time to explore. The yarn shop is called The Twisted Knitter; it it spacious, nicely arranged and has a very good selection of yarns. The owner Kim Pate, is gracious and helpful and regular return visits are
definitely in my future. Old downtown Mebane has a nice variety of shops and some interesting eateries; it was so pleasant to go into shops and be greeted with a friendly smile and a hello.

The yarn in the accompanying in picture (a bulky superwash 100% wool) is actually going to turn into a hooded scarf for me for next winter, although I had originally thought in terms of a hat. On the way home, it occurred to me that it is possible to knit a hooded scarf as a series of connected rectangles. While it is going to take some finagling, if I start now it may be done in time for next winter.

Saturday, January 15, 2011

Crocheted Bag Holder


This is another one of those no pattern projects that I sort of made up as I
went along. The top is an inch or two of single crochet. The mesh portion is
a simple series of chains (varying from 3-7 stitches in length) that are connected
to the middle of the last loop formed by each chain. In the beginning and central portion the tubular bag the chain lengths are progressively increasing and then are
decreased towards the end and finally finished off as two rounds of single crochets
for added strength on the end from which the bags will be pulled out. I crocheted this
is two shades of green "peaches and cream" cotton yarn.