Saturday, September 22, 2012
Dyeing with Mushrooms ... the saga begins
I had never considered this idea until one of the ladies at a 2nd Saturday spinning meeting and dye party mentioned that one of our mutual friends said you could extract
some kind of color from virtually any mushroom. There are lots of mushrooms popping up all over the place so I decided to give it a try. I'm using gallon plastic jugs (that used to contain vinegar) that I fill about 1/4 full with mushrooms and then add a mixture of 3 parts water to 1 part household ammonia. I am on my 3rd jug at this point (set one last week, another this Friday and one today) and the pattern has been the same with all three. First the liquid starts out translucent tan in color and is very dark within a few hours. This is what is shown in the pictures below. I can literally see the liquid turning darker as something is extracted out of the mushrooms; I am hoping that it is color. Tomorrow I hope to dye with the one that has been sitting for about a week. Stay tuned for developments...
Sunday, September 16, 2012
Hooded Scarf
This is a hooded scarf I finished last March knitted on size 13 straight needles. The yarn is a bulky merino superwash (Viking Balder) that came from The Twisted Knitter in downtown Mebane. This yarn is wonderfully soft and fun to knit.
Sunday, September 9, 2012
The Hat I Will Never Wear
Sometimes there are things you make just because you can - wearables that you will never wear
, unplanned flights of fantasy of unknown origin. I completed this knitted hat,tassels and all, last winter while waiting for the radiator on the truck to be repaired. The yarn is a bulky wool blend feels very soft. It looks almost cute on the manniquin head, which has turned out to be a very handy item.
Sunday, September 2, 2012
Dyeing Angora Rabbit Fiber with Indigo
This is the story of a pot of indigo ("instant" variety) that was left to sit for a couple of weeks. Since it looked regenerated (metallic sheen on the surface). I decided to see if I could dye some angora. At first things didn't look too hopeful.
But then once out of the pot and sitting on a screen, color began to develop.
The final blue looks quite nice and once dry it was a lovely shade of denim blue, no crocking and it feels soft and nice.
Tuesday, September 27, 2011
Low Input Washing & Dyeing of Wool - Part II
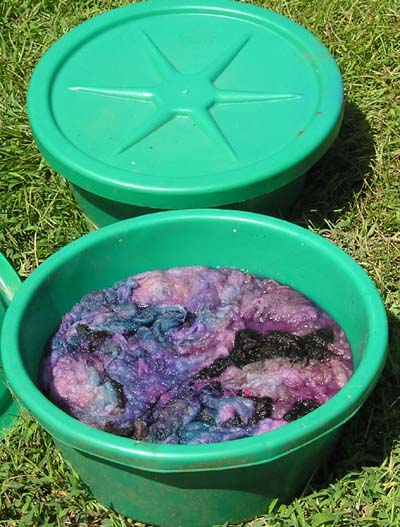
The second phase of the low input washing and dyeing experiment began with filling two old feed supplement tubs with water from the cistern system, putting in a generous two cups of vinegar and letting it warm up in the sun of a 90 plus degree day. I added the fleece (single fleece split in half), springled the dye on top (Cushings myrtle green and Cushings violet) and let it sit a minute. Then I mixed dye and wool by massaging them together with my hands (wearing gloves and mask because of the dye in powdered form). The point of this was to make the dyes color split to produce more interesting effects. The picture shows the fleeces in the dye pots after having been mixed together. I put the lids on and left it for 3 days. When I opened them up the dye bath was exhausted (no color left in the water). One rinse with warm water from the cistern and spinning out in the washer tub, resulted in minimal to no excess dye coming off (a very good sign). Now it is just time to let it dry and see how it spins up in the next phase.
Saturday, September 24, 2011
Low Input Washing & Dyeing Wool - Part I
This is my first try at seeing just how little in external energy inputs I can use to wash and dye wool. The idea was sequential washing and dyeing of the wool as opposed to just washing the wool and then expecting to spin it myself or send it off to be made into roving or yarn. The fleece was another soft Jacob fleece that I "discovered" while organizing/cleaning the basement. It was soaked in rain water from the cistern system (shown in picture) for 3 days (during 90 degree weather). The water was then drained off and used to water plants. This was
followed by a second soak for three days, after which the water was drained off, and the wool spun out in the washer tub to remove as much excess water as possible. At this stage the wool didn't feel too greasy at this point and the water wasn't that dirty either. I have used no soap and the wool seems like it is now ready for dyeing.
Friday, September 16, 2011
Crocheted Roving Rug
This was my first foray into crocheting with roving and I used a plastic size S hook. This black shetland roving was made from fleeces that were a bit tender and hence had more noils and neps than I would want in a roving for spinning. The first rug was bath mat sized, originally measuring 21" x 35". After wetting (done in the shower) and washing with Charlie's Soap, I rinsed it in rain water and tumbled it in the dryer with no heat to get out the excess moisture, then allowed it to air dry. The finished rug is 19.5" x 31" and it is tighter and feels firmer than it did originally, although still quite soft.
Subscribe to:
Posts (Atom)