Showing posts with label Dyeing. Show all posts

Tuesday, September 27, 2011

Low Input Washing & Dyeing of Wool - Part II


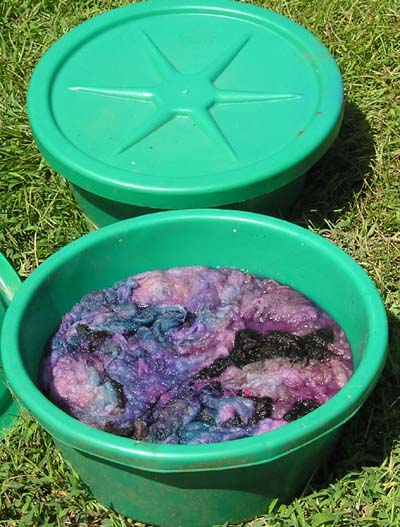
The second phase of the low input washing and dyeing experiment began with filling two old feed supplement tubs with water from the cistern system, putting in a generous two cups of vinegar and letting it warm up in the sun of a 90 plus degree day. I added the fleece (single fleece split in half), springled the dye on top (Cushings myrtle green and Cushings violet) and let it sit a minute. Then I mixed dye and wool by massaging them together with my hands (wearing gloves and mask because of the dye in powdered form). The point of this was to make the dyes color split to produce more interesting effects. The picture shows the fleeces in the dye pots after having been mixed together. I put the lids on and left it for 3 days. When I opened them up the dye bath was exhausted (no color left in the water). One rinse with warm water from the cistern and spinning out in the washer tub, resulted in minimal to no excess dye coming off (a very good sign). Now it is just time to let it dry and see how it spins up in the next phase.

Saturday, September 24, 2011

Low Input Washing & Dyeing Wool - Part I


This is my first try at seeing just how little in external energy inputs I can use to wash and dye wool. The idea was sequential washing and dyeing of the wool as opposed to just washing the wool and then expecting to spin it myself or send it off to be made into roving or yarn. The fleece was another soft Jacob fleece that I "discovered" while organizing/cleaning the basement. It was soaked in rain water from the cistern system (shown in picture) for 3 days (during 90 degree weather). The water was then drained off and used to water plants. This was
followed by a second soak for three days, after which the water was drained off, and the wool spun out in the washer tub to remove as much excess water as possible. At this stage the wool didn't feel too greasy at this point and the water wasn't that dirty either. I have used no soap and the wool seems like it is now ready for dyeing.

Saturday, June 26, 2010

Re-Discovering Natural Dyeing Part VI - Madder


With this post, I've used up the last of the pre-mordanted yarn with some madder dyeing which was a new experience for me. This madder was purchased dried from Louet sometime around 1997 - another of those "finds" when I moved. I soaked 4 oz in toe of an old knee-hi overnight in a cold water pot. This yielded the most amazing wine red color, which did not really translate into the dyed fiber. I used the usual method of putting pre-wetted yarn in cold pot, brought to a simmer and held for 30 minutes. In the accompanying picture, these are top to bottom: wool with copper, wool with alum, mohair with copper and mohair with alum.

Sunday, June 20, 2010

Rediscovering Natural Dyeing Part V - Red Sandalwood


The red sandalwood was in the form of a fine powder and was purchased from Carolina Homespun around 1996 (back when they were still headquartered in NC). About 4 oz was soaked overnight with pot brought to a simmer before adding the yarn. For this pot, it seemed like it would be interesting to soak portions of the yarn with oil (corn oil) prior to putting it in the pot. The idea was to use the oil as a resist of sorts. It did work in a subtile way as can be seen in the photograph. From top to bottom, the yarns are wool with copper, wool with alum, mohair with copper, and mohair with alum.

Wednesday, June 9, 2010

Re-Discovering Natural Dyeing Part IV - Osage Orange


For this dye pot, I used 2.6 oz Osage orange (all that I had). It was in the form of a coarse ground bark and probably purchased from Louet in 1994. This time I filled the dye pot, dropped in the osage orange in its sack and let it sit overnight. The water was a fairly deep shade of yellow the next morning. Pre-wetted skeins went directly into the cold dyepot, brought to simmering temperature and allowed to simmer for 30 minutes. Results are in the accompanying photo. From top to bottom they are: wool with copper, wool with alum, mohair with copper and mohair with alum. The colors have a brighter clearer quality of yellow compared to Eucalyptus and the copper mordant renders a color I would describe as old gold.

Thursday, June 3, 2010

Rediscovering Natural Dyeing Part III - Eucalyptus


For this particular dye pot, I used the same general procedure as before, i.e. soak dyestuff in mesh bag overnight, add to dyepot next day and simmer a few minutes before adding the fiber. The eucalyptus was picked locally by a friend and dried sometime around 2002 - another one of those finds from when I moved. I used about 8 oz. of dried leaves for this dyepot. The color is a clear, but slightly dull yellow when used with alum. The shine of the mohair really doesn't show through with the alum mordant as much as it did with the copper-mordanted mohair. In the photo from top to bottom the yarns are wool with copper, wool with alum, mohair with copper (my favorite) and mohair with alum. The dyepot smelled very nice on the back porch.

Tuesday, March 30, 2010

Re-Discovering Natural Dyeing Part II - Alkanet Root


For this particular dyepot I used dried alkanet root that I purchased commercially so long ago that I do not know the source, but it has to be at least 15 years old. I put about 6 oz of dried root in a mesh bag (old knee hi) and soaked it overnight. Next day I added the four skeins of yarn and simmered it for 2 hours. The accompanying photo shows from top to bottom - wool with copper, wool with alum, mohair with copper and mohair with alum. The bag with the dyestuff actually burst in the bath resulting in lots of vegetable matter in the yarn. It mostly came out with brushing and beating. According to my books alkanet root yields shades from soft gray-blues to gray greens under alkaline conditions and pinkish shades under acidic conditions depending on the mordant used.

Thursday, March 25, 2010

Re-Discovering Natural Dyeing - Part I Mordanting


Several years ago, for reasons that I no longer remember, I had some white shetland and white mohair yarn spun up as singles. I also have no record or memory of the mill that did the spinning. A big box of this was one of those discoveries made during the move from Apex to Efland (now almost two years ago). Another discovery was all these natural dye materials that I did not even know that I had. It seems natural to bring the two together. As a first step, I pre-mordanted the yarn. I decided on aluminum and copper since I already had them - Copper sulfate at the rate of 2 oz/lb (2.6 lbs total for 5 skeins each wool and mohair) and potassium aluminum Sulfate at the rate of 3 oz/lb + 6 tablespoons cream of tartar (5 skeins each of wool and mohair). I dissolved the metal salts completely in warm water before filling the pot. The yarn was simmered (not boiled) in a huge pot outside for 1/2 hour and allowed to cool in the pot. The accompanying photo shows the yarn hanging to dry. The plan was to dye a total of four skeins in each of five different dye baths. This will give me a comparison of wool and mohair with two different mordants.

Saturday, January 2, 2010

Snow Dyeing in North Carolina


I first heard of snow dyeing on the dyers list a few years ago, but never had the opportunity to try it because snow storms are relatively uncommon here in the piedmont of North Carolina. When a snow storm was forecast about a week before Christmas I planned out a couple of snow dyeing trials. This was mainly to give me a fun activity to look forward to since caring for farm animals in the snow and cold or the very real possibility of a power outage if it turned to ice. Most snow dyeing that I've read about uses cotton cloth, but I opted to use a skein of white handspun shetland yarn and a couple of silk scarves I happend to have on hand. I pre-wetted both scarves and yarn with vinegar water. I placed the scarves on an over-turned plastic serving dish that was put inside a basin; this gives the water in the snow a way to drain away as it melts. I also folded and scrunched the scarves together to allow for uneven penetration of the dye and produce more interesting patterns. The snow I used was actually frozen chunks of snow from the hood of my truck which I placed on top of the scarves and wool. Then I squirted various colors of dye (using 0.1% dilution of Mother MaKenzie's Miracle Dyes.
When the snow was melted I wrapped the yarn and scarves (separately) in plastic wrap (salvaged from the local feedstore) and microwaved them for 10 minutes total (2 five minute sessions). The first two photos below show the setup with snow and dye and the second two photos show the finished results.